

As someone who loves taking notes on paper, I'm constantly frustrated by one thing: the inability to search through my notes efficiently. If I had to find that one example from class on the fundamental theorem of calculus, I’d have to dig through thick stashes of paper to find the example.
This led me to build Paperflow, a web app that digitizes my notes and makes them instantly searchable.
Check it out live: https://paperflowapp.vercel.app
Architecture
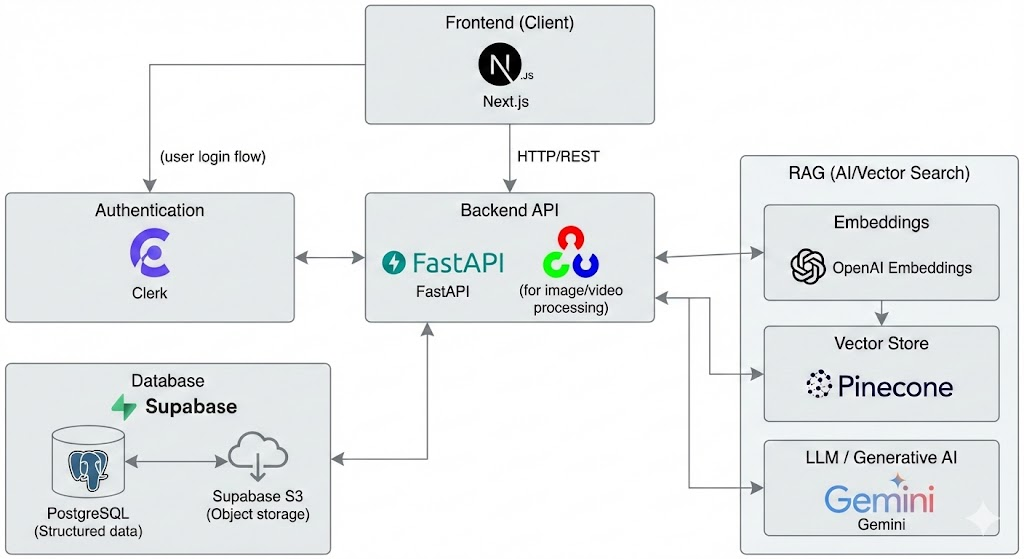
The frontend is built with Next.js, with a FastAPI backend for handling core logic and OpenCV for image processing. The RAG pipeline is built with OpenAI embeddings, Pinecone, and Gemini. The database is PostgreSQL, storing images in Supabase S3.
Backend
Picking Python was obvious, since all our image processing is done with OpenCV in Python. While I've had experience building with Flask before, I wanted to try out FastAPI.
The FastAPI backend holds everything together, from authentication to handling image processing. The API provides all the routes, which are accessed by the frontend. All the data relating to users and notebooks are stored in a PostgreSQL database, hosted on Supabase. The FastAPI backend is hosted on Render.
Here are the main parts of the backend (described in detail in their respective sections):
- Handling document detection & OCR
- Supporting RAG for semantic search
- Storing images with Supabase S3
- Authenticating users with Clerk
Document detection with OpenCV
Document detection went through several phases of experimentation, in order to get accurate results. Initially, I tried contour detection, which worked on simple images with a plain background, but performed extremely poorly on images with non-trivial backgrounds.
Stumbling across Dropbox's engineering blog post on Fast and Accurate Document Detection for Scanning, they discussed their approach of using Canny edge detection and Hough lines transform to detect quadrilaterals in the image. Implementing a similar approach, I leveraged Canny edge detection to find edges in the image and Hough lines transform to detect straight lines in the image. While the results were significantly better than using contour detection, there were still a few optimizations I made to handle different cases.
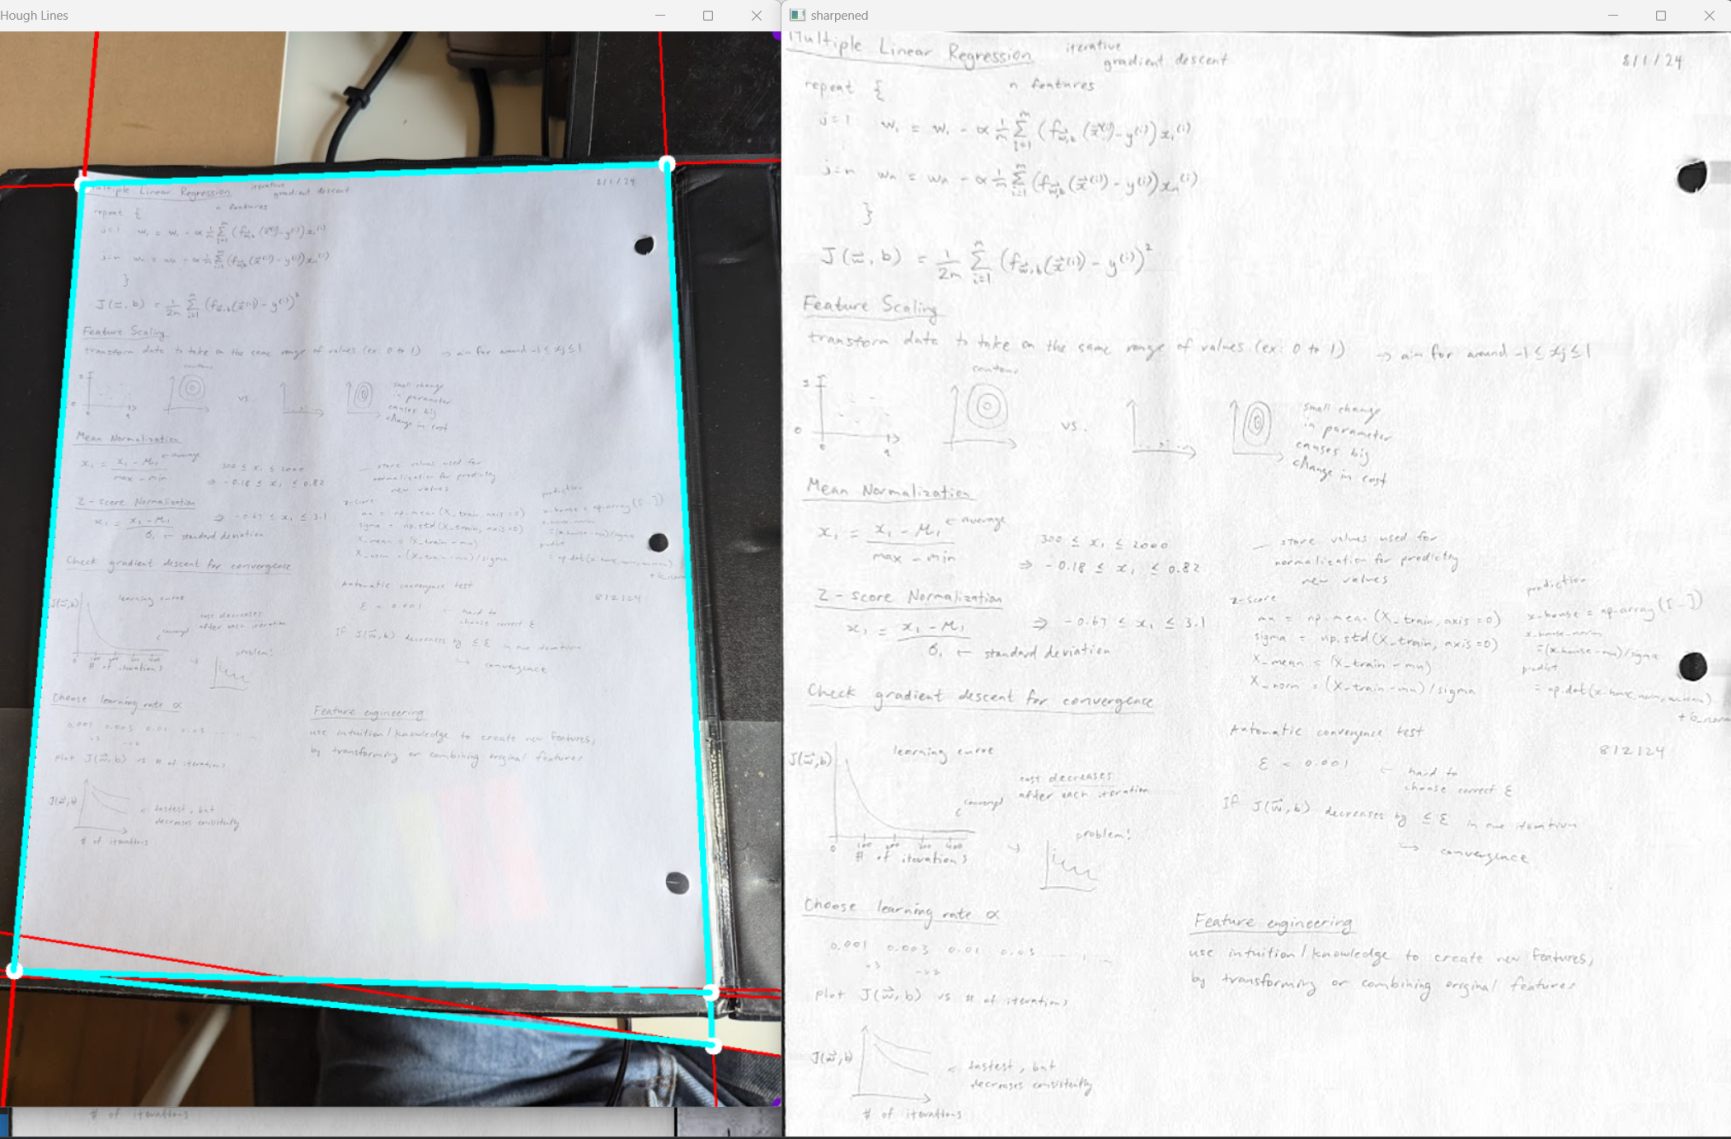 Tinkering with Hough lines transform.
Optimizations on this new approach:
- Adjusting the threshold for Hough lines transform to detect only the most relevant lines
- Applying gaussian blur and grayscale to the image before edge detection
- Grouping similar lines (close in proximity and have similar angles) from Hough lines transform together
To find the best quadrilateral, several metrics were used:
- The location of the each line (assume that each edge must be in its respective half of the page, ie. the right edge must be on the right half of the page)
- If there are multiple candidates for the same edge, we should take the edge that has the highest intensity
- If there are multiple candidates with the same intensity, we should take the edge closer to the edge of the screen
- Finally, if there are no such candidates, we should take the image's edge as the edge
Image processing is also done on the image to make the page more crisp and readable, to improve the user's experience. All of the image processing, including blurring, transforming the perspective, applying Hough lines transform, are done using OpenCV in Python.
OCR
Ideally, we wanted to extract each word along with their coordinates on the page, so search results could be tied to individual words on the page. This involved two steps: detecting individual words and extracting text using OCR.
Word detection was relatively simple. One possible solution was to use dilation with OpenCV to group nearby letters into clusters, and run contour detection to assign bounding boxes to words.
OCR, in comparison, was a lot more difficult. Here, I attempted different approaches, including testing out existing models and training our own OCR model.
For testing out existing models, we looked at top-performing OCR models, such as TrOCR. While these models were fairly accurate, there were many typos and errors that made it unideal to work with. Additionally, some of these models we would have to self-host, which would add computing costs to our backend. Thus, we also explored other options for performing OCR.
For training our own OCR model, I first found datasets with handwritten text, such as IAM Handwriting Dataset. For training, I loaded the datasets into Google Colab and pre-processed the images, including binarizing and resizing the images. I then implemented a convolutional neural network (CNN) architecture from a research paper. From there, I trained the model on Google Colab, saving intermediate results to Google Drive.
We only achieved about 50% accuracy, which was not quite good enough for our needs. There were still additional improvements I could've made to potentially increase the accuracy, but I decided to move on and explore different options. However, I still learned a lot about the entire process of training and running a machine learning model.
Since both options created less than ideal results, I looked to LLMs, such as Gemini. I knew LLMs would produce highly accurate OCR results, but with one major drawback: we wouldn't be able to associate each word with its location on the page. In the end, I decided the trade-off was still worth it, since the search results would be significantly more accurate. I went with Gemini Flash 2.0, since I had free credits, and produced highly accurate results.
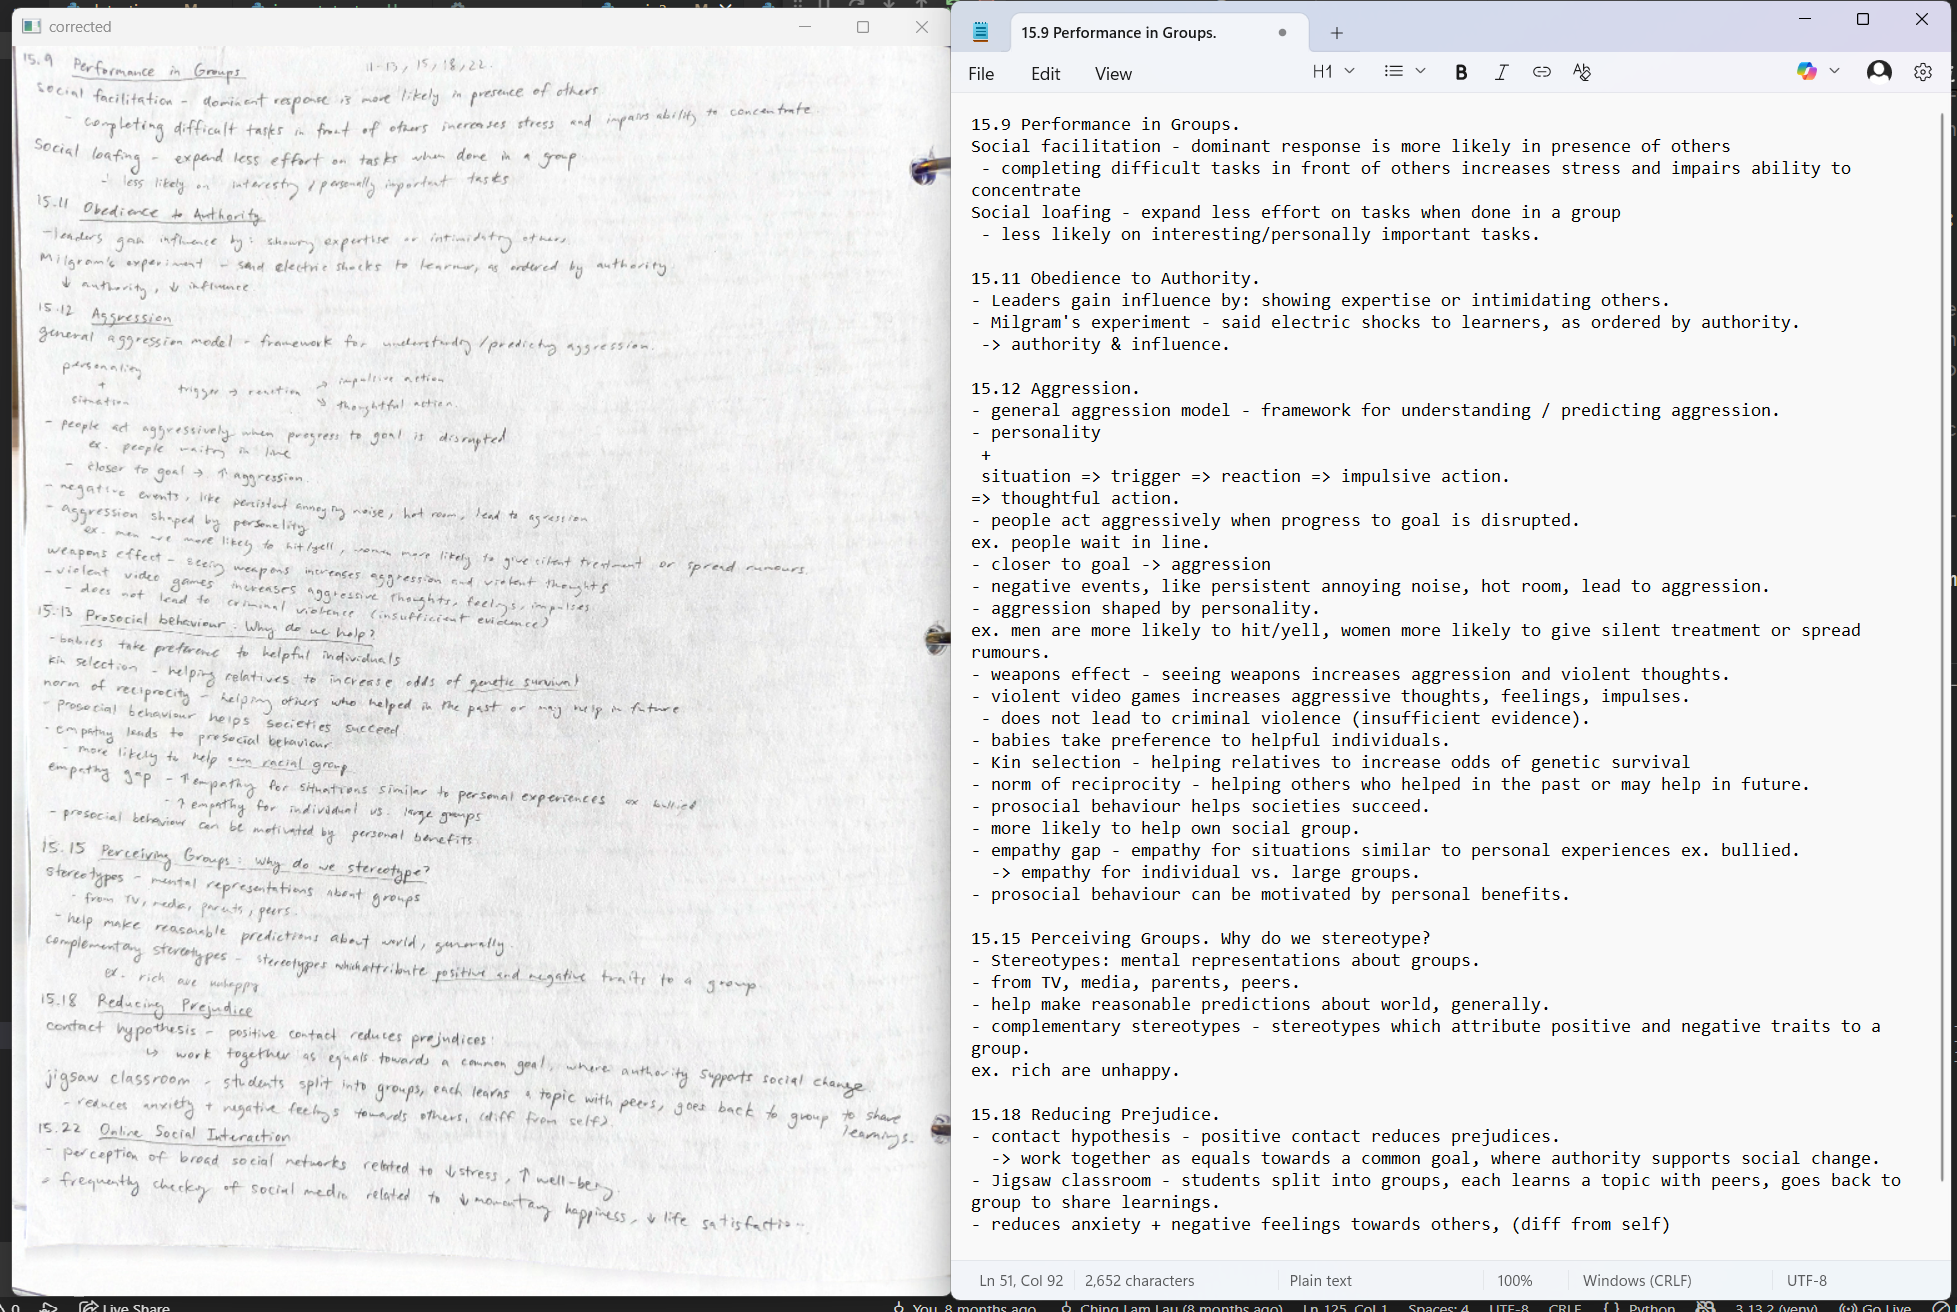 OCR results.
RAG-powered semantic search
While implementing a classic search bar was relatively simple, I also wanted to allow users to semantically search through their notes. This meant that users could ask questions like "What are convolutional neural networks?" to find relevant content within their notebooks. The solution was, of course, to bring in vector embeddings and retrieval-augmented generation (RAG) into the application.
RAG allows us to use our existing content to provide context for the LLM, allowing the LLM to accurately generate answers to questions. Additionally, the LLM will only provide answers from the notebook, without using external knowledge.
When a user uploads a new page into their notebook:
- create vector embeddings of extracted text content from the page using OpenAI embeddings
- split the vector embeddings into chunks and store these chunks into Pinecone with its associated metadata (page number, user, notebook, text content), which can be retrieved later
When a user searches using a question:
- retrieve relevant chunks from Pinecone using the question's vector embedding
- feed the retrieved chunks as context to a LangChain prompt, and generate an answer using Gemini
Additionally, if a user deletes a page, we can delete the associated chunks from Pinecone.
Image storage
For notebook pages, we store each page as an image in S3 buckets on Supabase. When the user wants to fetch an image, the backend returns a presigned url that allows the user to access an image from Supabase for a limited amount of time, assuming the user has valid credentials. The frontend must request for another presigned url when the current url expires, to make sure users are only able to fetch images they have access to.
Authentication
Clerk handles all of the authentication, providing Google OAuth and email & password as login methods. Once the user logs in, a user is created in the PostgreSQL database, which is linked to their notebooks and pages.
Frontend & Design
The challenge with the frontend was crafting an intuitive interface that looked and felt like my binder, but supported the features of digital notes. The frontend is built with Next.js and Tailwind CSS, hosted on Vercel.
The user interface takes inspiration from existing note-taking apps like Notion and PDF viewers like Adobe Acrobat, creating a familiar and intuitive interface for users. The features are neatly organized into toolbars and sidebars, grouping similar features and keeping the interface simple.
One of the main design decisions was to keep the original scan of the page instead of only extracting the text. By keeping the original notebook page, the app preserves the look and feel of paper notes, while combining the functionality of digital notes.
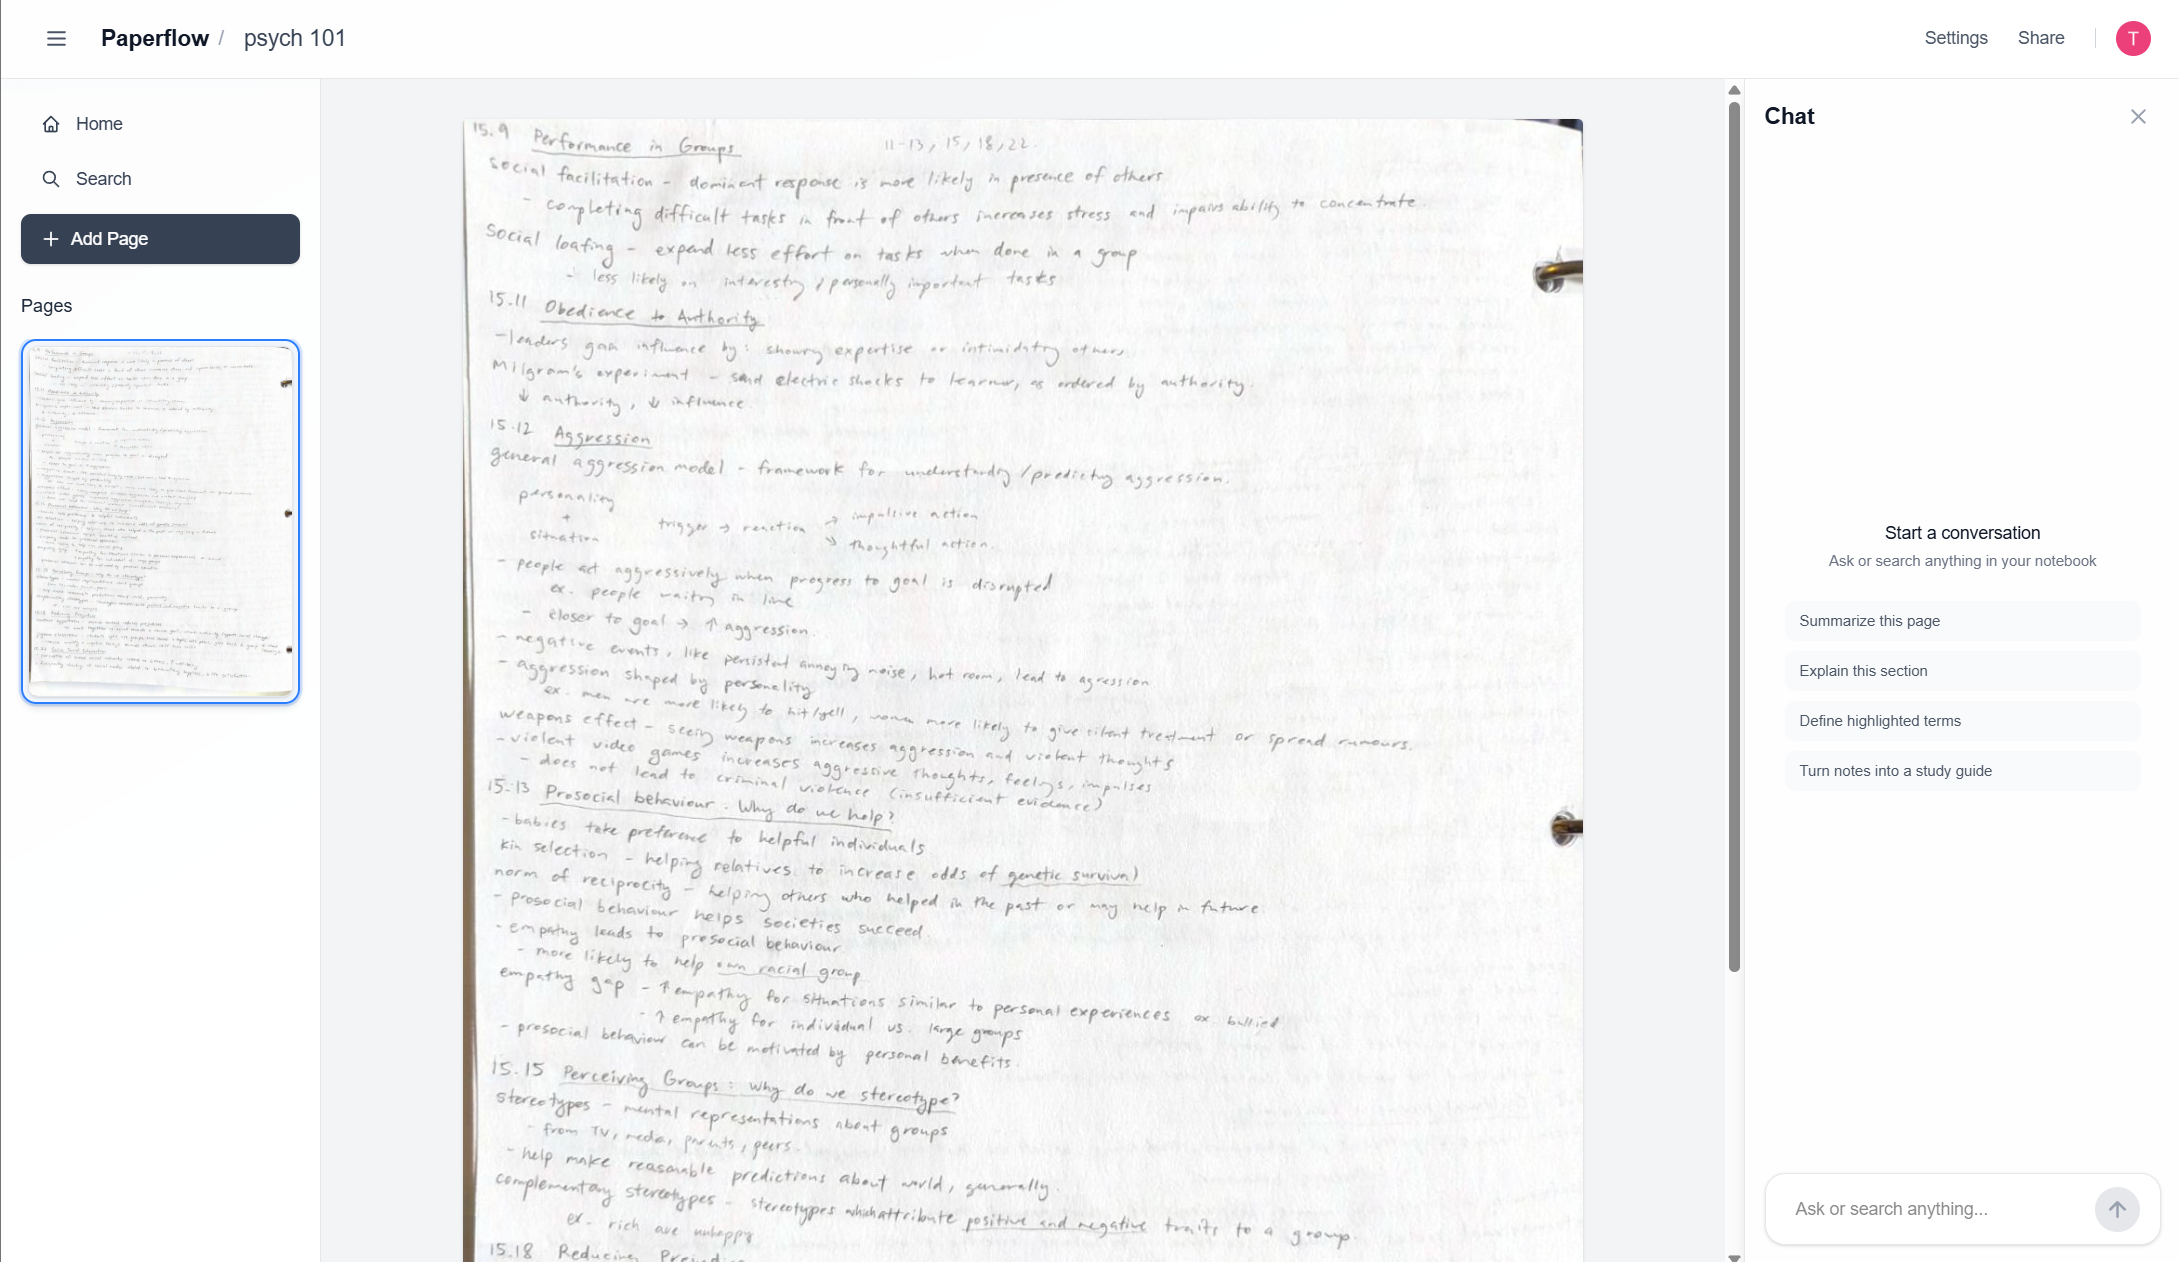 Interface for viewing a notebook.
Challenges
Upon hosting our frontend and backend separately on cloud hosting services, we ran into everyone's favourite error: CORS issues 😭. Turns out, we couldn't send large image files from frontend to backend without the backend refusing to accept the request, despite having the frontend url as an allowed origin. The solution we currently have is to downsize the image before sending it to the backend, sacrificing a bit of quality. Another potential solution is to upload the image to Supabase S3 via a presigned url, and fetch it from the cloud in the backend.
Conclusion
Overall, I learned a lot from building Paperflow, from developing an accurate algorithm for page detection to tying everything together into an intuitive web application.
Live site: https://paperflowapp.vercel.app
GitHub repo: https://github.com/MiniCube11/paperflow